

In our previous blog posts, we explored the theory behind building maintainable software. We started by looking at The Multifaceted Issues of Software Development, where we identified common problems like code duplication, tight coupling, and scalability issues that make software hard to maintain. Then we introduced Clean Architecture: A Deep Dive into Structured Software Design, explaining how this pattern helps us separate concerns and manage dependencies effectively.
We continued by examining How Clean Architecture Solves Common Software Development Challenges, showing the practical benefits of using layered architecture. Finally, we explored MVVM as a Complementary Pattern for Clean Architecture Applications, explaining why the Model-View-ViewModel pattern works well as a presentation layer within Clean Architecture.
If you are new to Clean Architecture or MVVM concepts, I recommend reading these posts first.
They provide the theoretical foundation that makes this practical implementation easier to understand.
Now, let’s see these concepts in action.
This post shows you how to build a real React application using Clean Architecture principles with the MVVM pattern. We'll create a to-do application that demonstrates how theory translates into working code. You'll learn how to structure your React app in layers, implement MVVM with React hooks and components, and use dependency injection to follow the Dependency Inversion Principle.
The example application comes from my talk at the code.talks conference in 2023, where I presented these concepts. You can watch the presentation on YouTube if you're interested in seeing the concepts explained in more detail.
By the end of this post, you'll have a practical template for building React applications that are easier to maintain, test, and extend. You can find the complete source code on our GitHub repository.
Example to-do-app
Now let's put theory into practice. We'll build a simple to-do application that demonstrates how Clean Architecture and MVVM work together in a real React project.
Let's be honest upfront: a to-do application is probably not the best real-world example for demonstrating Clean Architecture and MVVM. In practice, you'd never build such a complex architecture for a simple CRUD application like this. The overhead would be completely unjustified for something so straightforward.
So why use a to-do app? While architecturally overkill, it works well as a learning example because it's easy to understand and contains all the essential operations (create, read, update, delete) without getting lost in complex business logic. The real value of Clean Architecture becomes apparent when you're dealing with more complex scenarios: applications with multiple user types requiring different permissions, systems that need to integrate with several external APIs, or projects where business rules frequently change and affect multiple parts of the application.
Think of this as a training foundation that demonstrates the patterns clearly. Remember that the complexity trade-off we discussed in our previous post absolutely applies here. For a real to-do app, a simpler approach would make much more sense.
As we explore each component, I'll show you the key excerpts here. You can find the complete implementation with all files in our GitHub repository.
Features
Our to-do application covers the core operations you'll need in most applications:
- Read: Get a list of all to-do's
- Create: Add a new to-do with title and description
- Update: Modify an existing to-do
- Delete: Remove a to-do from the list
These operations might seem basic, but they represent the foundation of data management in any application, from simple tools to complex enterprise systems.
UI
Our application consists of three main views that handle the complete to-do workflow. Let's look at the wireframes to understand the user journey:
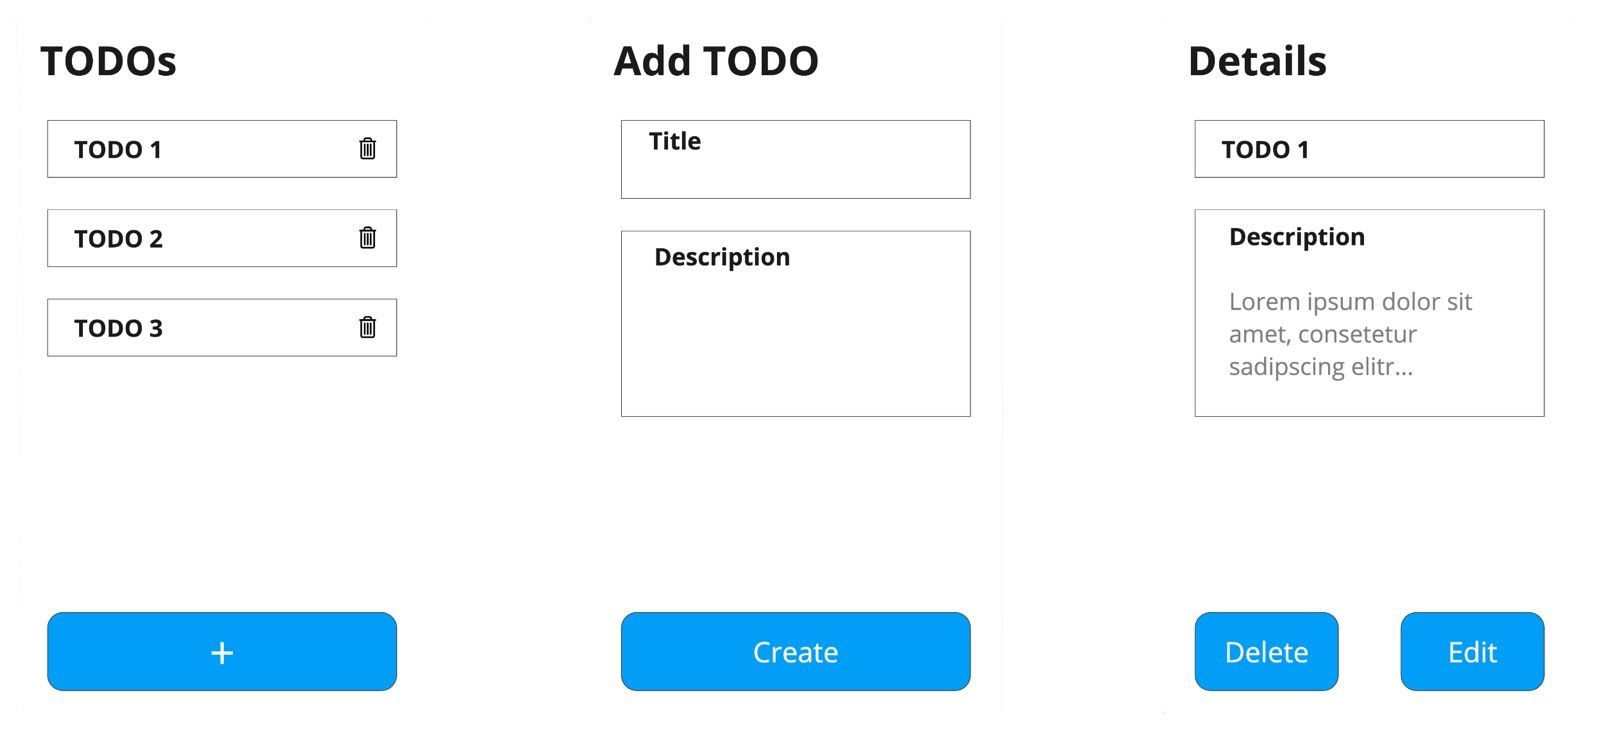
1. To-do's view
This is the main screen users see when they open the application. It displays all available to-do's in a list format with a ‘+’ button at the bottom for creating new items. Each to-do item includes a trash icon for quick deletion without needing to open the details view.
2. Add to-do view
When users click the ‘+’ button, they navigate to this view where they can create a new to-do. The form includes fields for title and description. After filling in the details and clicking ‘Create’, users return to the main to-do's view with their new item added.
3. Details view
Clicking on any to-do item takes users to this detailed view showing the complete title and description. Here, users can edit the content directly or choose to delete the to-do. Both ‘Edit’ and ‘Delete’ actions return users to the main to-do's view.
User flow summary:
- Quick deletion: Users can delete items directly from the list using trash icons.
- Creation flow: Users navigate from the main view to the add view, then return to the main view after creating a to-do.
- Edit flow: Users go from the main view to the details view for editing, then return to the main view.
- Detailed deletion: Users can also delete items by navigating to the details view and then returning to the main view.
This simple three-view structure covers all CRUD operations while keeping the user experience straightforward and intuitive.
Mapping application components to Clean Architecture layers
Now that we understand what our application does, let's map its components to Clean Architecture layers. This step is crucial because it shows how theoretical concepts translate into real code structure.
As we explored in Clean Architecture: A Deep Dive into Structured Software Design, Clean Architecture consists of four layers, with the innermost being the most abstract and the outermost being the most specific and frequently changing. The detailed structure and responsibilities of each layer are explained in that post.
Let's look at Uncle Bob's original Clean Architecture diagram to visualize how our application components fit into this structure:

Here's how our to-do application components map to each layer:
Entities (Enterprise Business Rules)
- Todo - Our core business entity that represents a task
- ITodoRepository interface - Defines what data operations the domain needs (contract for data access)
Use Cases (Application Business Rules)
- Get Todos Use Case - Retrieves all to-do's
- Get Todo Use Case - Retrieves a specific to-do
- Create Todo Use Case - Creates a new to-do
- Update Todo Use Case - Updates an existing to-do
- Delete Todo Use Case - Removes a to-do
Interface Adapters
- ViewModels (acting as Presenters):
- Todo List ViewModel
- Create Todo ViewModel
- Todo Details ViewModel
- Todo Repository Implementation - Implements the ITodoRepository interface
Frameworks & Drivers
- React Views (UI Components):
- TodoList.tsx
- CreateTodo.tsx
- TodoDetails.tsx
- Awilix DI Container - Dependency injection framework
- React Router - Navigation framework
Why this mapping matters:
The key principle is that dependencies flow inward. Use Cases depend on the repository interface (defined in the domain), not the implementation. The repository implementation depends on the data source. This creates a system where business logic remains independent of UI frameworks, databases or external services.
Technical note:
Notice how the repository interface lives in the domain layer while its implementation lives in the Interface Adapters layer. This follows the Dependency Inversion Principle - high-level modules (Use Cases) depend on abstractions (ITodoRepository), not on concrete implementations.
You can change React to Angular, or local storage to a REST API, without affecting your core business rules or use cases. This is the power of Clean Architecture in action.
Application Flow
Before we dive into the code, let's understand how data flows through our application. This flow demonstrates how Clean Architecture and MVVM work together to create a clear separation of concerns.
Let's trace through a typical user interaction using the Todo Details View as an example:
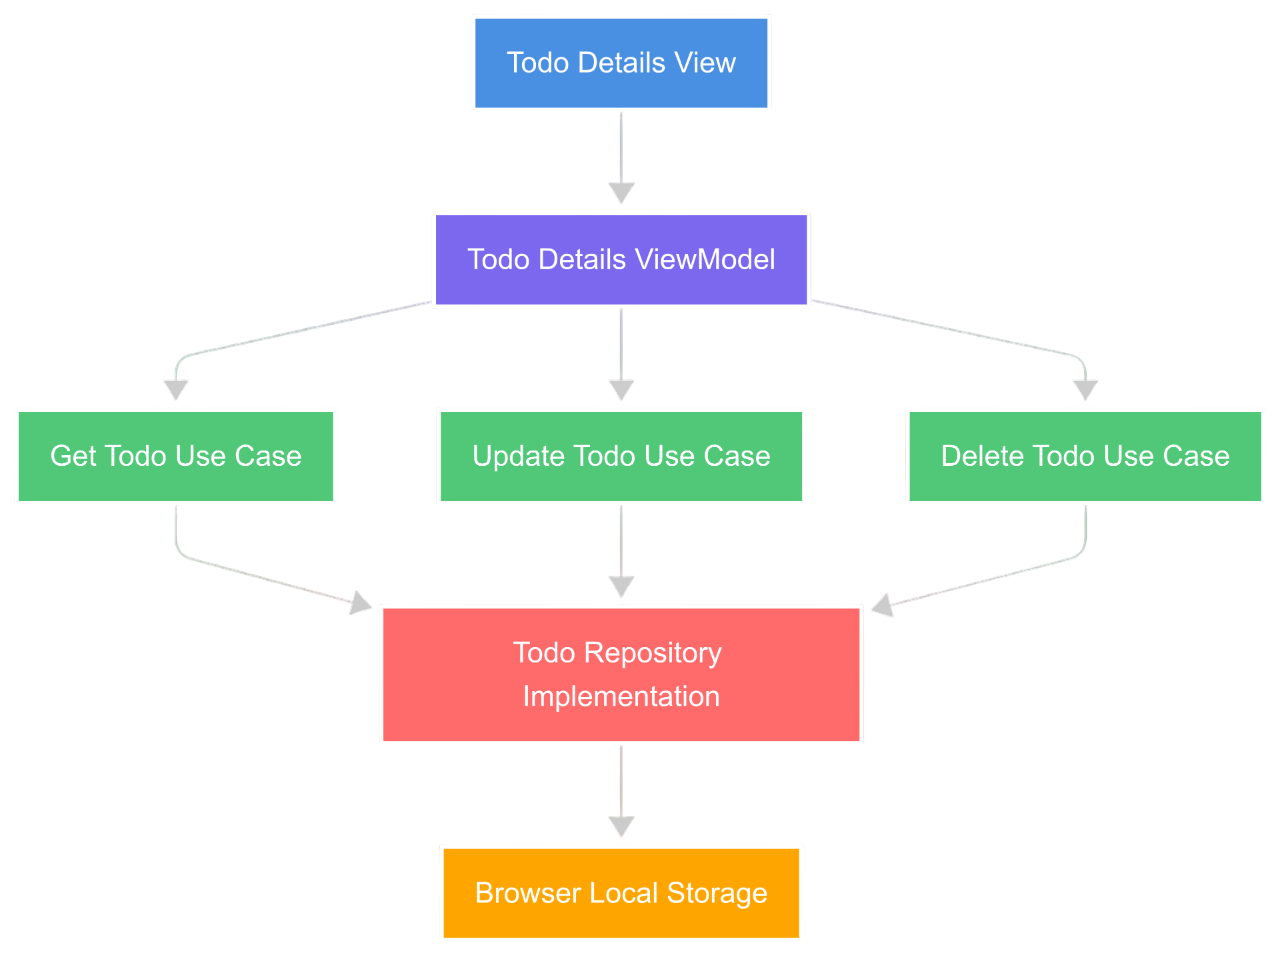
Here's how the flow works:
- User Interaction: The user interacts with the Todo Details View (clicking Edit, Delete, or viewing details)
- ViewModel Processing: The View passes the user's action to the Todo Details ViewModel, which determines which use case to execute
- Use Case Execution: The ViewModel calls the appropriate use case:
- Get Todo Use Case - Retrieves a specific to-do for viewing
- Update Todo Use Case - Updates an existing to-do with new data
- Delete Todo Use Case - Removes a to-do from the system
- Repository Access: All use cases interact with the to-do repository to perform their operations
- Data Persistence: The repository directly handles browser's local storage operations to retrieve, store, or delete the actual data
Why this flow matters:
This structure ensures that each layer has a single responsibility. The View handles UI rendering and forwards user interactions to the ViewModel, the ViewModel manages presentation logic, use cases contain business rules, and the repository handles data access. This separation makes the code easier to test, maintain and modify.
The same flow pattern applies to all other views in our application - Todo List View and Create Todo View follow identical patterns with their respective ViewModels and use cases.
Structure
Now that we have seen the high-level application flow, let's examine the project structure and walk through the most important folders one by one.
├── README.md
├── package.json
├── vite.config.ts
├── src
│   ├── adapter                 # implements domain contracts
│   │   └── repository
│   │       └── todoRepository.ts
│   ├── di                      # Awilix container & registrations
│   │   └── container.ts
│   ├── domain                  # enterprise & application business rules
│   │   ├── model
│   │   │   └── types
│   │   │       └── Todo.ts
│   │   ├── repository
│   │   │   └── ITodoRepository.ts
│   │   └── useCases
│   │       └── todo
│   │           ├── createTodoUseCase.ts
│   │           ├── deleteTodoUseCase.ts
│   │           ├── getTodoUseCase.ts
│   │           ├── getTodosUseCase.ts
│   │           └── updateTodoUseCase.ts
│   ├── presenter               # React-specific presentation layer
│   │   ├── components
│   │   │   ├── atoms
│   │   │   └── molecules
│   │   └── pages
│   │       ├── CreateTodo
│   │       │   └── …
│   │       ├── TodoDetails
│   │       │   └── …
│   │       └── TodoList
│   │           ├── TodoList.tsx
│   │           └── todoListViewModel.ts
│   ├── App.tsx                 # root component
│   └── main.tsx                # application bootstrap
└── tsconfig.json
How the folders map to Clean Architecture layers:
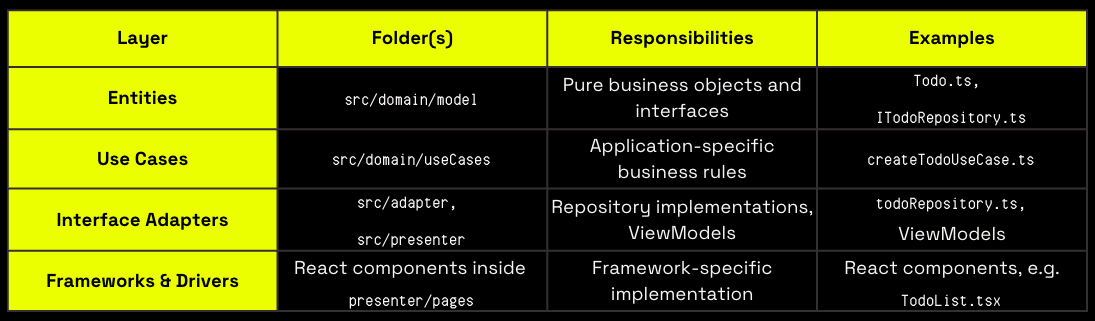
As you can see from the table above, our folder structure clearly maps to Clean Architecture layers, with dependencies flowing inward from outer folders (presenter) to inner ones (domain).
Now let's see how these layers are actually wired together in practice.
A quick look at the DI container
Here's how the dependency injection container connects all these components:
export const DI = createContainer();

DI.register({
  // repository
  todoRepository: asFunction(todoRepository),

  // use cases
  createTodoUseCase: asFunction(createTodoUseCase),
  deleteTodoUseCase: asFunction(deleteTodoUseCase),
  getTodoUseCase:    asFunction(getTodoUseCase),
  getTodosUseCase:   asFunction(getTodosUseCase),
  updateTodoUseCase: asFunction(updateTodoUseCase),

  // view-models
  todoListViewModel:     asFunction(createTodoListViewModel),
  todoDetailsViewModel:  asFunction(createTodoDetailsViewModel),
  createTodoViewModel:   asFunction(createCreateTodoViewModel),
});
Understanding the dependency injection container
Looking at the code above, you can see how we register different components using specific methods:
asFunction()for factory functions that create components liketodoRepositoryand use cases- Each registration has a name (like
"todoRepository","getTodosUseCase") that we use to resolve dependencies throughout our application
The benefits of this approach:
-
Inversion of control – Instead of components creating their own dependencies, the container provides them automatically. For example, when we resolve
"todoListViewModel", the container automatically creates it with the required use cases (getTodosUseCase,deleteTodoUseCase) already injected. This follows the Dependency Inversion Principle we discussed in Clean Architecture: A Deep Dive into Structured Software Design, where high-level modules depend on abstractions, not concrete implementations. -
Testability – In unit tests, you can replace these registrations with mock implementations. For instance, instead of registering the real
todoRepository, you register a test version that returns predictable data. This allows you to test each component in isolation without depending on real storage operations or external services. -
Flexibility – Need to switch from local storage to an API or database? Create a new repository implementation and change the
todoRepositoryregistration. The rest of your application remains unchanged because it depends on theITodoRepositoryinterface, not the concrete implementation.
With the folder layout and dependency wiring clarified, we can focus on a concrete slice of the code. In the following section we will examine the TodoList View / ViewModel pair to see how the presentation layer consumes the use cases and keeps UI logic separate from business rules.
TodoList View / ViewModel Implementation
Let's examine a concrete implementation of the MVVM pattern in our React application. The TodoList View and ViewModel pair demonstrates how the presentation layer consumes use cases while keeping UI logic separate from business rules.
The TodoList View
The View component is responsible for rendering the UI and forwarding user interactions to the ViewModel:
import { FC } from 'react'
import { useNavigate } from 'react-router-dom'
import { DI } from '../../../di/ioc.ts'

export const TodoList: FC = () => {
  const navigate = useNavigate()

  const { todos, deleteTodo, showDeleteDialog, closeDeleteDialog, todoToDelete } = DI.resolve('todoListViewModel')

  return (
    <>
      <Page
        headline="TODOs"
        footer={<Button customStyles={styles.button} label="+" onClick={() => navigate('/todo/create')} />}>
        <List
          items={todos}
          onItemClick={todo => navigate(`/todo/detail/${todo.id}`)}
          onItemDelete={showDeleteDialog} />
      </Page>

      {todoToDelete !== undefined && (
        <DeleteTodoDialog
          open={true}
          todoName={todoToDelete.title}
          onConfirm={deleteTodo}
          onCancel={closeDeleteDialog} />
      )}
    </>
  )
}
What the View does:
- Dependency resolution: Uses
DI.resolve('todoListViewModel')to get the ViewModel instance with all required dependencies injected - UI rendering: Renders the page structure with a headline, list of to-do's and add button
- Navigation handling: Manages routing to create and detail views using React Router's
useNavigate - Event forwarding: Passes user interactions to the ViewModel without containing business logic
- Conditional rendering: Shows the delete confirmation dialog based on ViewModel state
Notice that the View remains passive. It displays data and forwards events but doesn't contain any business logic.
The TodoList ViewModel
The ViewModel handles presentation logic and UI state management, serving as the coordination point between our React View and the domain's use cases:
import { useEffect, useState } from 'react'
import { Todo } from '../../../domain/model/Todo.ts'
import { Id, UseCase, UseCaseWithParams } from '../../../domain/model/types'

type Dependencies = {
  readonly getTodosUseCase: UseCase<Todo[]>
  readonly deleteTodoUseCase: UseCaseWithParams<void, Id>
}

export const todoListViewModel = ({ getTodosUseCase, deleteTodoUseCase }: Dependencies) => {
  const [todoToDelete, setTodoToDelete] = useState<Todo>()
  const [todos, setTodos] = useState<Todo[]>([])

  const showDeleteDialog = (todo: Todo) => setTodoToDelete(todo)

  const closeDeleteDialog = () => setTodoToDelete(undefined)

  const getTodos = async () => {
    const result = await getTodosUseCase.execute()
    setTodos(result)
  }

  const deleteTodo = async () => {
    if (todoToDelete !== undefined) {
      await deleteTodoUseCase.execute(todoToDelete.id)
      setTodos(todos.filter(todo => todo.id !== todoToDelete.id))
      closeDeleteDialog()
    }
  }

  const sortById = (prevTodo: Todo, todo: Todo) => prevTodo.id < todo.id ? -1 : prevTodo.id > todo.id ? 1 : 0

  useEffect(() => {
    void getTodos()
  }, [])

  return { todos: todos.sort(sortById), deleteTodo, showDeleteDialog, closeDeleteDialog, todoToDelete }
}
What the ViewModel does:
- Dependency injection pattern: Receives its dependencies as parameters in the function signature, following the Dependency Inversion Principle from our Clean Architecture posts - the ViewModel depends on abstractions (use case interfaces) rather than concrete implementations.
- Local state management: Manages two pieces of local state using React's
useStatehook:todos: Holds the current list of to-do's for displaytodoToDelete: Tracks which to-do is pending deletion (for the confirmation dialog)
- Use case orchestration: Coordinates between the View and domain use cases:
getTodos(): Executes thegetTodosUseCaseand updates local statedeleteTodo(): Executes thedeleteTodoUseCaseand updates the UI
- Presentation logic: Contains UI-specific logic that doesn't belong in the domain:
sortById: Ensures to-do's are always displayed in consistent order- Dialog state management:
showDeleteDialogandcloseDeleteDialog
- Lifecycle management: The
useEffecthook initializes the component state when the View mounts, automatically loading to-do's without any dependency triggers.
ViewModels in Clean Architecture context
This ViewModel implementation demonstrates the Interface Adapters layer in action: it translates between domain use cases and React components while managing presentation state. Because the ViewModel receives its dependencies as parameters, you can easily test it in isolation by injecting mock use cases.
This approach ensures that our presentation logic remains clean, testable and independent of both the UI framework and the business domain.
Use cases
Our ViewModel depends on use cases to execute business operations. Let's examine how these use cases work.
Type definitions
First, let's look at the types that ensure our use cases follow a consistent pattern:
export type Id = string

export type UseCase<Result> = {
  readonly execute: () => Promise<Result>
}

export type UseCaseWithParams<Result, Params> = {
  readonly execute: (params: Params) => Promise<Result>
}
These types provide a consistent contract for all use cases in our application. Every use case must implement an execute method that returns a Promise, ensuring asynchronous operations are properly handled.
Get Todos use case
This use case handles retrieving all to-do's from our system. It's the foundation for displaying the to-do list in our application and gets called whenever we need to refresh or initially load the to-do data.
import { Todo } from '../../model/Todo.ts'
import { UseCase } from '../../model/types'
import { ITodoRepository } from '../../repository/ITodoRepository.ts'

type Dependencies = {
  readonly todoRepository: ITodoRepository
}

export const getTodosUseCase = ({ todoRepository }: Dependencies): UseCase<Todo[]> => ({
  execute: () => todoRepository.get(),
})
Delete Todo use case
This use case manages the deletion of a specific todo item. It's triggered when users want to remove a to-do either from the main list view or from the detailed to-do view.
import { Id, UseCaseWithParams } from '../../model/types'
import { ITodoRepository } from '../../repository/ITodoRepository.ts'

type Dependencies = {
  readonly todoRepository: ITodoRepository
}

export const deleteTodoUseCase = ({ todoRepository }: Dependencies): UseCaseWithParams<void, Id> => ({
  execute: (id: Id) => todoRepository.delete(id),
})
What the use cases do:
- Dependency injection: Both use cases receive their dependencies as parameters in the function signature, following the Dependency Inversion Principle. They depend on the
ITodoRepositoryinterface, not a concrete implementation. - Type safety: The use cases implement specific type contracts:
getTodosUseCase: ReturnsUseCase<Todo[]>- a use case that returns an array of to-do'sdeleteTodoUseCase: ReturnsUseCaseWithParams<void, Id>- a use case that takes an ID parameter and returns void
- Business logic orchestration: While these examples are simple, use cases coordinate business operations. The
getTodosUseCaseretrieves all to-do's, whiledeleteTodoUseCaseremoves a specific to-do by ID. - Repository abstraction: Both use cases interact with the
ITodoRepositoryinterface, ensuring they remain independent of data source implementation details. - Asynchronous operations: All use cases return Promises, making them ready for asynchronous operations like API calls or database transactions.
Use cases beyond CRUD
The examples above might make use cases seem like simple CRUD wrappers, but that's just because our to-do app is intentionally basic. In real applications, use cases handle more sophisticated business operations that could span multiple repositories and contain complex logic.
Let’s take a look at some examples of use cases that are responsible for handling more complex operations:
1. Cross-entity operations
This use case demonstrates how business operations often span multiple entities. When publishing an article, we need to validate user permissions, update the article status, and notify subscribers. These are operations that touch different parts of our domain.
const publishArticleUseCase = ({
  articleRepository,
  userRepository,
  notificationRepository
}: Dependencies) => ({
  execute: async (articleId: Id, authorId: Id) => {
    // Check if author has permissions
    const author = await userRepository.getById(authorId)
    if (!author.canPublish) {
        throw new Error('Insufficient permissions')
    }

    // Update article status
    const article = await articleRepository.getById(articleId)
    const publishedArticle = await articleRepository.update(articleId, {
      ...article,
      status: 'published',
      publishedAt: new Date()
    })

    // Notify subscribers
    await notificationRepository.notifySubscribers(authorId, publishedArticle)

    return publishedArticle
  }
})
2. Multi-repository coordination
Complex applications often need to aggregate data from multiple sources to create meaningful insights. This use case shows how to coordinate between different repositories while applying business logic to the combined data.
const generateUserDashboardUseCase = ({
  userRepository,
  projectRepository,
  analyticsRepository
}: Dependencies) => ({
  execute: async (userId: Id) => {
    // Fetch user data
    const user = await userRepository.getById(userId)

    // Get user's projects
    const projects = await projectRepository.getByUserId(userId)

    // Calculate analytics across all projects
    const analytics = await analyticsRepository.getProjectAnalytics(
      projects.map(project => project.id)
    )

    // Business logic: determine user's productivity score
    const productivityScore = calculateProductivityScore(projects, analytics)

    return {
      user,
      projects,
      analytics,
      productivityScore,
      recommendations: generateRecommendations(user, productivityScore)
    }
  }
})
3. Complex business logic
Real-world business processes involve multiple validation steps, calculations and coordination between systems. This order processing use case demonstrates how use cases handle multi-step workflows with business rules and error handling.
const processOrderUseCase = ({
  orderRepository,
  inventoryRepository,
  paymentRepository,
  customerRepository
}: Dependencies) => ({
  execute: async (orderData: OrderData) => {
    // Validate customer eligibility
    const customer = await customerRepository.getById(orderData.customerId)
    if (customer.status !== 'active') {
        throw new Error('Customer account inactive')
    }

    // Check inventory and reserve items
    const reservations = await Promise.all(
      orderData.items.map(item =>
        inventoryRepository.reserveItem(item.productId, item.quantity)
      )
    )

    // Calculate pricing with business rules
    const pricing = calculateOrderPricing(orderData.items, customer.tier)

    // Process payment
    const payment = await paymentRepository.processPayment(
      customer.paymentMethod,
      pricing.total
    )

    // Create order
    const order = await orderRepository.create({
      ...orderData,
      pricing,
      paymentId: payment.id,
      status: 'confirmed'
    })

    return { order, payment, reservations }
  }
})
What makes these use cases valuable
- Business logic centralization: Use cases become the single place where complex business rules live, making them easier to maintain and test.
- Cross-cutting concerns: They handle operations that span multiple entities and repositories, something that individual repositories can't do.
- Transaction-like operations: Use cases can coordinate multi-step operations, ensuring consistency across different data sources.
- Domain knowledge: They encode the specific business processes and workflows that make your application valuable.
Real-world scenarios where use cases shine
Here are some common scenarios where use cases provide real architectural value. These are just a few examples, you'll find use cases become essential whenever your application involves complex business workflows, multi-step operations or coordination between different parts of your system:
- E-commerce order processing: Inventory checks, payment processing, customer validation, shipping calculations
- Content management: Publishing workflows that involve content validation, user permissions, and notification systems
- User onboarding: Account creation, permission setup, welcome emails, initial data population
- Reporting and analytics: Data aggregation from multiple sources, complex calculations, caching strategies
- Integration workflows: Syncing data between internal systems and external APIs
Use cases in Clean Architecture context
These use cases demonstrate the Application Business Rules layer in Clean Architecture. They contain application-specific logic while remaining independent of external concerns like databases, UI frameworks or external services.
Remember, while our to-do example shows simple use cases for clarity, the pattern becomes invaluable when dealing with complex business operations that require coordination between multiple parts of your system.
Repository
The repository calls our use cases to perform data operations. Let's examine our repository implementation that directly handles browser's local storage operations.
import { Todo } from '../../domain/model/Todo.ts'
import { Id } from '../../domain/model/types'
import { ITodoRepository } from '../../domain/repository/ITodoRepository.ts'

export const todoRepository = (): ITodoRepository => {
  const COLLECTION_NAME: string = 'todos'

  const get = (): Promise<Todo[]> => {
    try {
      const result = localStorage.getItem(COLLECTION_NAME)
      return result !== null ? JSON.parse(result) : []
    } catch (error) {
      return Promise.reject(error)
    }
  }

  const getById = async (id: Id): Promise<Todo> => {
    const todos = await get()
    const todo = todos.find(({ id: todoId }) => todoId === id)

    if (todo === undefined) {
      throw Error(`Could not find todo with id ${id}`)
    }
    return todo
  }

  const create = async (title: string, description: string): Promise<Todo> => {
    const todos = await get()

    const id = `${Date.now()}`
    const newTodo: Todo = { title, description, id }

    localStorage.setItem(COLLECTION_NAME, JSON.stringify([...todos, newTodo]))

    return newTodo
  }

  const update = async (id: Id, title: string, description: string): Promise<Todo> => {
    const updatedTodo = { ...await getById(id), title, description }
    const todos = (await get()).filter(({ id: todoId }) => todoId !== id)

    localStorage.setItem(COLLECTION_NAME, JSON.stringify([...todos, updatedTodo]))

    return updatedTodo
  }

  const deleteTodo = async (id: Id): Promise<void> => {
    const todos = (await get()).filter(({ id: todoId }) => todoId !== id)

    localStorage.setItem(COLLECTION_NAME, JSON.stringify(todos))
  }

  return { get, getById, create, update, delete: deleteTodo }
}
What the repository does:
- Direct implementation: The repository contains the localStorage implementation, handling all data persistence operations directly.
- CRUD operations: Provides all basic data operations:
get(): Retrieves all to-do's from localStorage, parsing JSON or returning empty arraygetById(id): Finds a specific to-do by ID and throws an error if not foundcreate(title, description): Generates a new ID, creates the to-do, and saves to localStorageupdate(id, title, description): Merges updates with existing to-do and savesdelete(id): Filters out the specified to-do and saves the remaining list
- Error handling: Includes try-catch blocks for localStorage operations and meaningful error messages.
- Interface implementation: Implements the
ITodoRepositoryinterface defined in the domain layer. - Async operations: All methods return Promises to maintain consistency with potential database operations, even though localStorage is synchronous.
- Type safety: Uses TypeScript's utility types to ensure type safety when creating and updating to-do's.
Repository in Clean Architecture context
This repository demonstrates a clear implementation of the Interface Adapters layer in Clean Architecture. It contains the localStorage implementation, handling all data persistence operations directly while remaining completely isolated from business logic. Use cases depend on this repository through the ITodoRepository interface, allowing us to easily switch storage mechanisms without affecting other layers.
This approach ensures that our core application logic remains independent of storage implementation details.
Key benefits of this pattern:
- Abstraction: Use cases depend on the repository interface, not the concrete implementation
- Flexibility: You can easily create different repository implementations (localStorage, REST API, database) without changing domain logic
- Testability: You can inject mock repository implementations for testing use cases in isolation
- Separation of concerns: The repository handles data access logic while use cases handle business logic
Real-world repositories might include additional responsibilities like:
- Data mapping: Converting between persistence models and domain entities
- Error handling: Managing data access failures and providing meaningful error responses
- Caching: Optimizing performance by storing frequently accessed data
- Query optimization: Handling complex data retrieval patterns
However, responsibilities like combining data from multiple sources or business logic transformations belong in use cases, not repositories. The repository pattern should focus solely on data access concerns while use cases handle orchestration and business logic.
The pattern remains the same - the repository abstracts data access details from the domain layer while staying within its architectural boundaries.
Conclusion
In our previous blog posts, we explored the theory behind Clean Architecture and MVVM. Now we've seen how these concepts work in practice - from entities and use cases to ViewModels and repositories.
As we discussed in our previous post, Clean Architecture requires careful consideration for smaller projects. Our to-do application demonstrates these patterns in a simplified context, helping you understand when and how to apply them to projects where the complexity trade-off makes sense.
These patterns provide a solid architectural foundation. While scaling always requires thoughtful implementation, this structure gives you the flexibility to handle growing complexity. Each layer has clear responsibilities, dependencies flow inward and the code remains testable and maintainable.
Remember, while this to-do example demonstrates the patterns clearly, real-world applications that justify this architectural complexity usually involve multiple user roles, external system integrations, complex business rules, or frequently changing requirements. Those are the cases where Clean Architecture truly shines and where simpler approaches fall short.
You can find the complete implementation in our GitHub repository - use it as a starting point for your own projects. If you want to see these concepts explained in more detail, you can watch my presentation from the 2023 code.talks conference.
Building maintainable software doesn't require complex frameworks or complicated patterns - it requires thoughtful architecture. Clean Architecture and MVVM provide that structure, helping you write code that lasts.